AWS EKS OIDC with Google Workspace
23 Apr 2022In order to achieve user traceability of admin actions in you Kubernetes cluster, it is a good idea to set up personalized accounts. In the IAM User Traceability in AWS EKS post I was showing the specifics of aws-auth ConfigMap user and role mapping. This post dives into OIDC integration for AWS EKS user management.
Alternatively to aws-auth it is possible to use an OpenID Connect Identity provider with AWS EKS. The diagram below illustrates this approach.
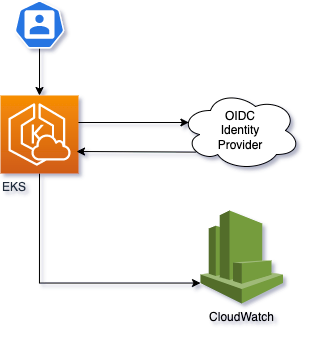
Usage of the identity provider offers huge benefits (if the users are configured to have personalised identities):
- User Traceability
- Single Sign On
For a list of certified providers, see OpenID Certification on the OpenID site.
An important detail however, is that not all OIDC providers offer ‘groups’ claim, therefore it is not possible to do fine-tune user authorization. For example Google Workspace does not offer groups claim, so if you want to use Google Workspace as your user directory for Kubernetes cluster users, you will not be able to manage different levels of user access with Google Groups.
To overcome this problem, we can use a federated OpenID Connect provider. There are many options available, free and paid ones. This post covers a free solution.
Federated OpenID Connect Providers
Federated OpenID Connect Providers allow to combine multiple upstream Identity Providers and offer extra functionalities, like providing groups claim where it is not natively supported by the upstream provider.
Dex is an OSS example of a federated provider. Here is a list of Dex-implemented connectors. As we can see, Google connector supports groups claim and refresh tokens (which is required for kubectl to work).
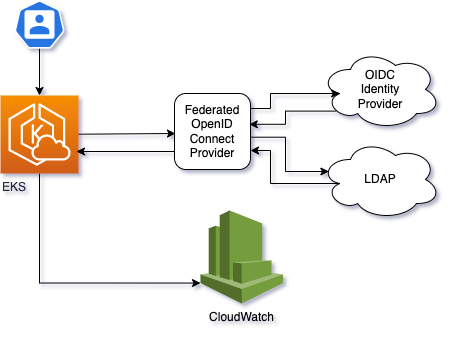
In this example I will set up AWS EKS user management with Google Workspace and group support via Dex google connector. If you have Google Workspace Business Plus and up, you might want to concider using Dex to LDAP integration - this connector is stable, while Dex to Google is still in Alpha state.
From the diagram above, it is clear that we need to set up/configure the following resources:
- Google Workspace OIDC configuration
- Dex OIDC Provider
- Configure AWS EKS Cluster to work with iDP
- Configure client
1. Google Workspace OIDC configuration
Create a new Google Cloud Platform project
This step is optional. You can use an existing project if you have a suitable one. Here is the official documenation for creating a project. Below is a brief recap.
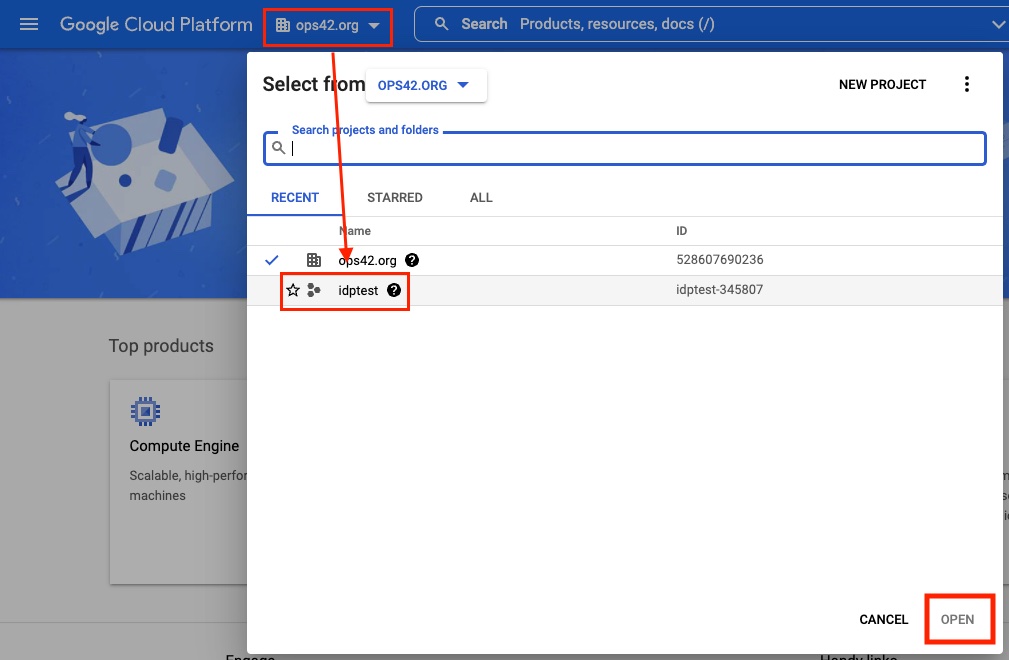
- Open https://console.cloud.google.com
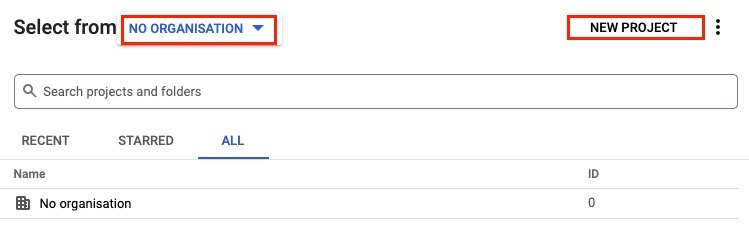
- Find a ‘Select a Project’ menu in the top bar

- Select an organization and click ‘New Project’
- Name the new project and hit ‘Create’
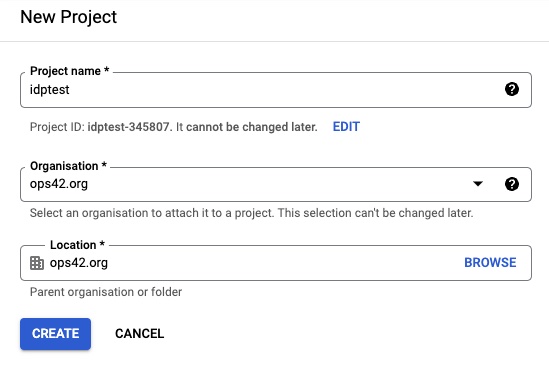
- Once the project is created, select it
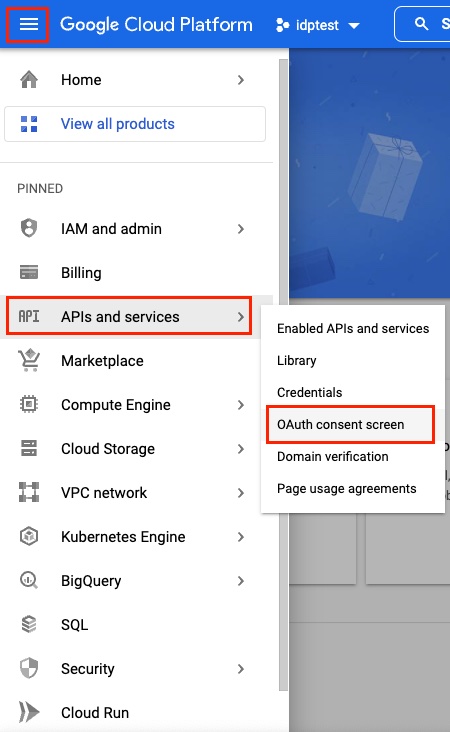
Configure OAuth Consent screen
OAuth needs a consent screen before it can acquire user credentials.
-
Open Oauth Consent Screen Menu f
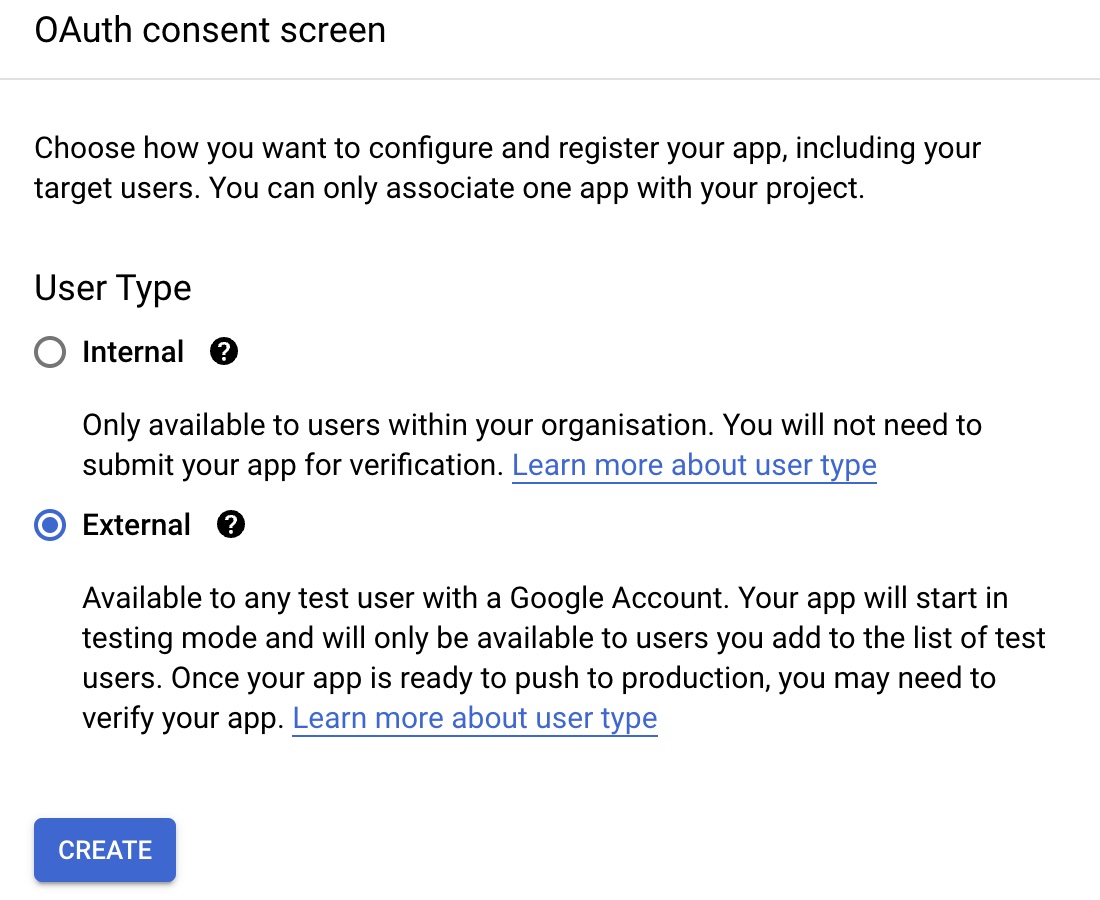
-
Select “External” user type
- Add information about the application name, support email and domain
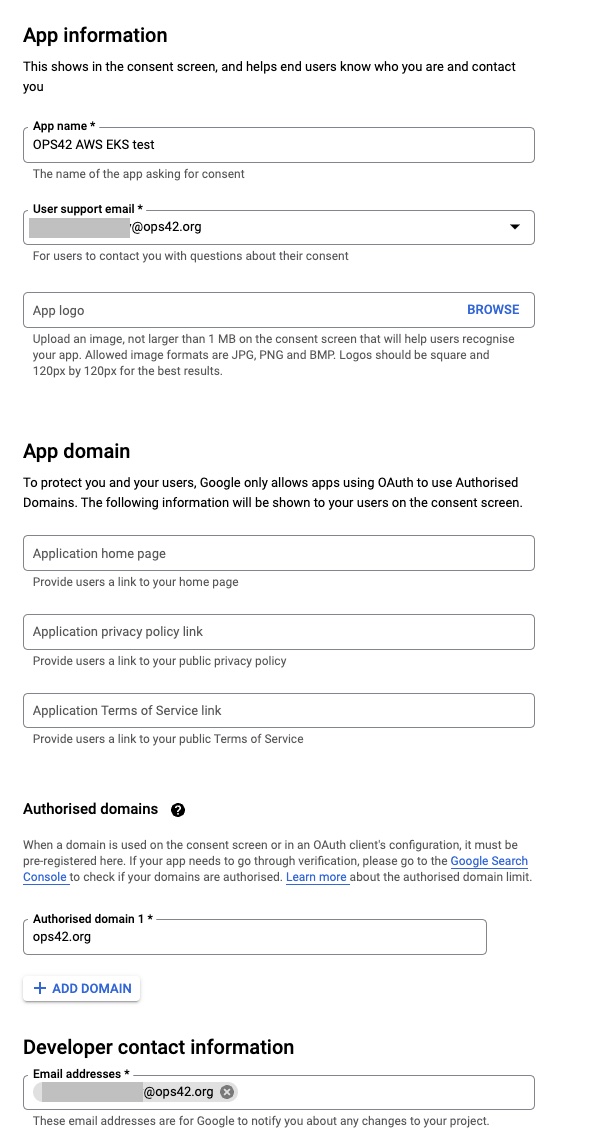
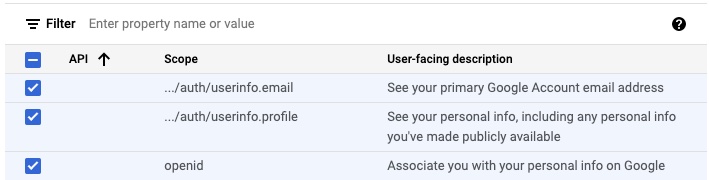
- Select openid, userinfo.email and userinfo.profile for scopes
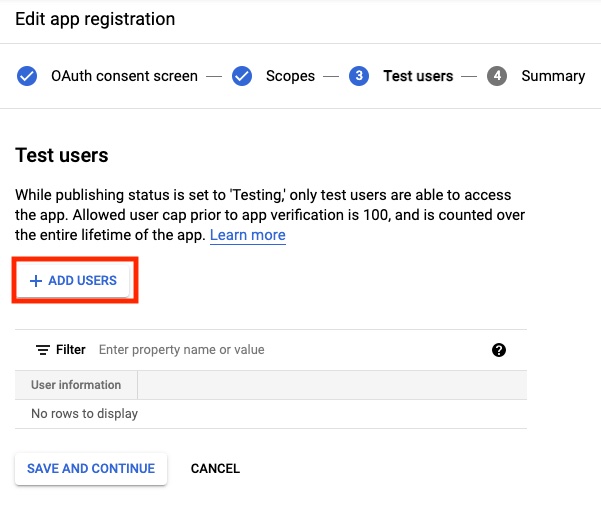
- Add at least one test user
Create Google API credentials for OIDC
Create a new OAuth ClientID Key
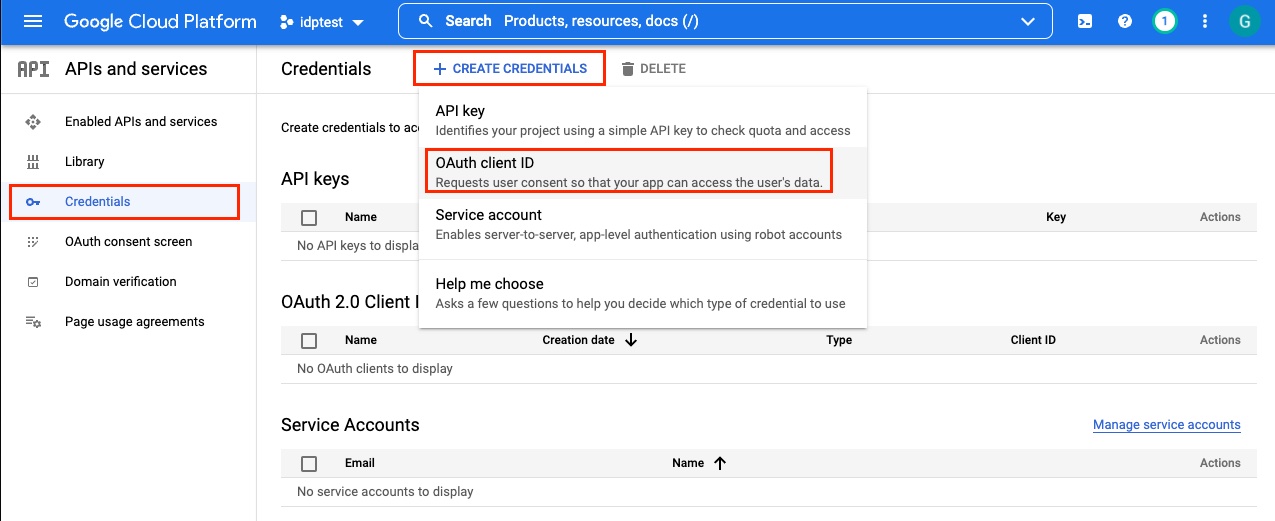
- Select Web application for application type and provide a name
Add ‘https://dex.example.com/callback’ to “Authorised redirect URIs” field.
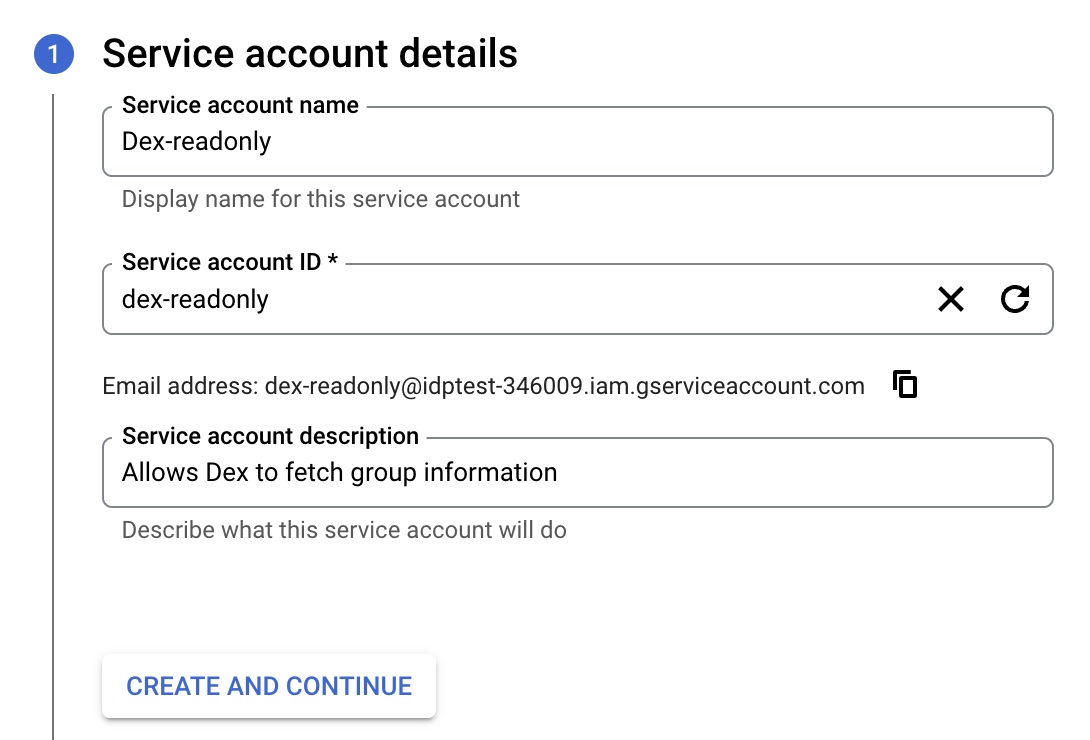
Create a service account to fetch groups
To allow Dex to fetch group information from Google, you will need to configure a service account for Dex to use. This account needs Domain-Wide Delegation and permission to access the https://www.googleapis.com/auth/admin.directory.group.readonly API scope.
- Open the Service Accounts page
- Click “Create Service Account”
- Provide a name, id and description for the account and click “Create and Continue”
- On the “Grant this service account access to the project” screen click “Continue” (do not add anything)
- On the “Grant users access to this service account” screen click “Done” (do not add anything)
- Click on the newly created service account and open “Keys” tab
- Click Add key > Create new key > JSON and click Create, the key will be downloaded to your computer
- From your Google Workspace domain’s Admin console, go to Menu > Security > Access and data control > API controls.
- In the “Domain-wide delegation” area click “Manage domain-wide delegation”
- Click “Add new”
- In the “Client ID” field enter the client id from the JSON generated on step 7 above
- in “OAuth scopes” enter “https://www.googleapis.com/auth/admin.directory.group.readonly”
- Click “Authorise”
- Enable the Admin SDK
2. Dex OIDC Provider
It is generally a good idea to run the Dex OIDC Provider outside of the Kubernetes cluster which it is going to support. Failed Dex might lock you out of the cluster. In this case you will have to fall back to using IAM account access to restore Dex functionality. Running outside of cluster requires some extra effort if you do not have a separate cluster or workflow for such workloads.
Dex needs to be accessible from both, client web browser and Kubernetes API.
For the sake of simplicity and focus on the OIDC configuration, I will take a couple of shortcuts, these need to be adjusted according to the real cluster setup:
- Dex will run on the same cluster.
- I will use a Classic Service load balancer to skip Ingress controller installation. This is a legacy solution. Normally you would use Ingress.
- Certificate will be created manually. This can be automated by CertManager.
Dependencies
Make sure you have the following dependencies prepared:
Ingress Controller
We need some kind of ingress controller to provide access to Dex. This default configuration uses a Classic LoadBalancer, and one should concider using AWS LoadBalancer Controller instead. More info in AWS Docs.
helm repo add ingress-nginx https://kubernetes.github.io/ingress-nginx
helm repo update
helm install \
  ingress-nginx ingress-nginx/ingress-nginx \
  --namespace ingress-nginx \
  --create-namespace
Verify ingress installation. You should see a DNS name assigned to ingress-nginx-controller in EXTERNAL-IP column
kubectl get svc -n ingress-nginx
Set up DNS record for your ingress controller. This can be automated via ExternalDNS controller. Get the canonical HostedZoneId of the load balancer with the following command:
aws elb describe-load-balancers --load-balancer-names XXXXXXXXXXXXXXXXXXXXXXXXXXXXXXX
Then generate batch
cat << 'EOF' > batch.json
{
    "Comment": "Create ingress record",
    "Changes": [
        {
            "Action": "CREATE",
            "ResourceRecordSet": {
                "Name": "dex.<domain.com",
                "Type": "A",
                "AliasTarget": {
                    "HostedZoneId": "ZXXXXXXXXXXXXX",
                    "DNSName": "XXXXXXXXXXXXXXXXXXXXXXXXXXXXXXXXXXXXXXXXXX.us-east-1.elb.amazonaws.com",
                    "EvaluateTargetHealth": false
                }
            }
        }
    ]
}
EOF
Then create a route53 record. Note that the hosted zone id is the id of the Route53 hosted zone, not the canonical hosted zone id from above.
aws route53 change-resource-record-sets --hosted-zone-id ZXXXXXXXXXXXXX --change-batch file://batch.json
CertManager
Dex requires TLS setup, so we need a CertManager or some other way of managing certificates.
helm repo add jetstack https://charts.jetstack.io
helm repo update
helm install \
  cert-manager jetstack/cert-manager \
  --namespace cert-manager \
  --create-namespace \
  --set installCRDs=true
Create an ACME Certificate issuer. More info in CertManager documentation.
cat << 'EOF' | kubectl apply -f -
kind: ClusterIssuer
apiVersion: cert-manager.io/v1
metadata:
  name: acme
spec:
  acme:
    email: user@yourdomain.com
    privateKeySecretRef:
      name: acme-account-key
    server: 'https://acme-v02.api.letsencrypt.org/directory'
    solvers:
      - http01:
          ingress:
            class: nginx
EOF
Dex
Create a new namespace and make it default
kubectl create ns dex
Create secrets with Google Workspace credentials. We generated these credentials in one of the previous steps.
kubectl create secret generic \
  dex-env \
  --from-literal=GOOGLE_CLIENT_ID=<GOOGLE_CLIENT_ID> \
  --from-literal=GOOGLE_CLIENT_SECRET=<GOOGLE_CLIENT_SECRET> \
  --namespace dex
Create secrets with Google Workspace Service Account JSON downloaded earlier:
kubectl create secret generic dex-google-sa \
  --from-file=<downloaded_sa_file>.json \
  --namespace dex
Create a minimal Dex configuration. Replace placeholder values:
- example.com is the domain pointing to your ingress controller.
- example_sso.com is the domain of Google Workspace users who will need SSO
- downloaded_sa_file.json Google Service Account JSON file name created in create a service account to fetch groups section.
# dex.yaml
ingress:
  enabled: true
  className: nginx
  annotations:
    kubernetes.io/tls-acme: "true"
    cert-manager.io/cluster-issuer: acme
  hosts:
    - host: dex.example.com
      paths:
        - path: /
          pathType: ImplementationSpecific
  tls:
    - secretName: dex-tls
      hosts:
        - dex.example.com

# Use credentials from a Secret
envFrom:
  - secretRef:
      name: dex-env

# Mount a volume with google service account json
volumes:
  - name: dex-google-sa
    secret:
      secretName: dex-google-sa
      defaultMode: 420
volumeMounts:
  - mountPath: /var/run/dex-google-sa
    name: dex-google-sa

config:
  issuer: https://dex.example.com
  storage:
    type: kubernetes
    config:
      inCluster: true

  # See https://dexidp.io/docs/connectors/ for more options
  connectors:
    - type: google
      id: google
      name: Google
      config:
        # Connector config values starting with a "$" will read from the environment.
        clientID: $GOOGLE_CLIENT_ID
        clientSecret: $GOOGLE_CLIENT_SECRET

        # Dex's issuer URL + "/callback"
        redirectURI: https://dex.example.com/callback

        # Whitelist allowed domains
        hostedDomains:
          - example_sso.com

        # Google does not support the OpenID Connect groups claim and only supports
        # fetching a user's group membership with a service account.
        # This service account requires an authentication JSON file and the email
        # of a G Suite admin to impersonate:
        serviceAccountFilePath: /var/run/dex-google-sa/downloaded_sa_file.json
        # adminEmail should be the email of a G Suite super user. The service account you
        # created earlier will impersonate this user when making calls to the admin API.
        # A valid user should be able to retrieve a list of groups when testing the API.
        adminEmail: admin@example.com

  # Client for kubelogin
  staticClients:
    - id: kubelogin
      secret: some-random-secret
      name: "Kubelogin"
      redirectURIs:
        - http://localhost:8000
        - http://localhost:18000
Add dex Helm repo and install Helm Chart
helm repo add dex https://charts.dexidp.io
helm repo update
helm install \
  dex dex/dex \
  --namespace dex \
  --values dex.yaml \
  --wait
3. Configure AWS EKS Cluster to work with iDP
It is possible to do this either via console or eksctl. Below is the AWS Console version, see official AWS documentation for the eksctl version.
- Open the Amazon EKS console at https://console.aws.amazon.com/eks/home#/clusters.
- Select a cluster to configure
-
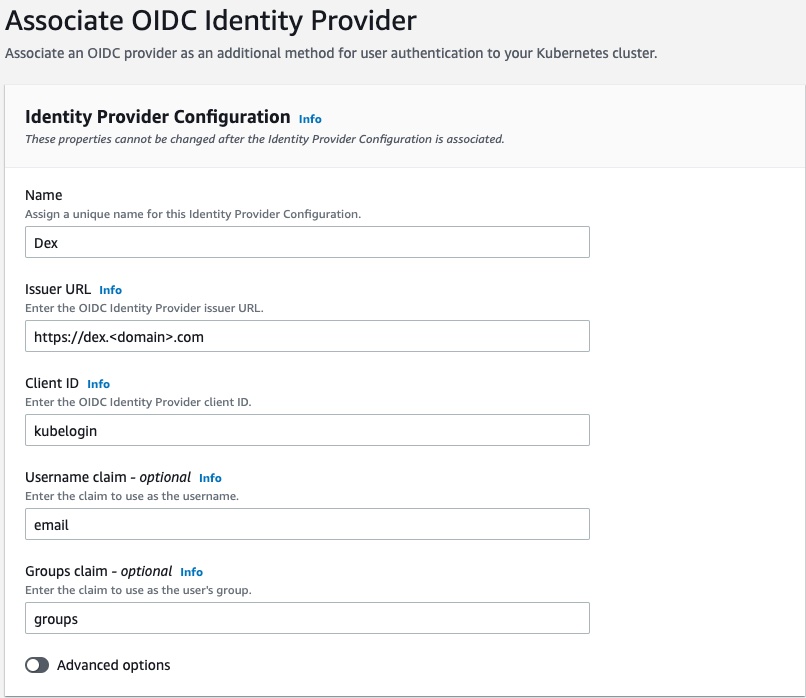
On Configuration > Authentication tab select Associate Identity Provider.
Configure the following fields:
- Name - a unique name for Identity Provider Configuration
- Issuer URL - set to https://dex.example.com
- Client ID - client ID defined earlier in staticClients section of Dex configuration. Set to ‘kubelogin’.
- Username claim - A claim which will be used as a username. A default is “sub” which is a unique user id. It looks something like “10769150350006150715113082367” which is not very user-friendly. It is a good idea to use something like an email, if they are unique in your setup. A list of claims provided by Google Workspace can be found here: https://accounts.google.com/.well-known/openid-configuration. Set to ‘email’.
- Groups claim - the claim to use as the users’s group. Set to ‘groups’.
In Advanced Options section you can set up prefixes for username and groups. It might be helpful if you have a mix of users from different sources. For example you can set a prefix of “oidc:” as suggested in the official AWS documentation.
It will take about 15 minutes for OIDC configuration to configure.
Set up Kubernetes RBAC
In this example we map k8s.cluster-admin@example.com group to a standard pre-existing cluster-admin role. You can create other roles and mappings for different user types.
cat << 'EOF' | kubectl apply -f -
apiVersion: rbac.authorization.k8s.io/v1
kind: ClusterRoleBinding
metadata:
  name: dex-cluster-cluster-admin
roleRef:
  apiGroup: rbac.authorization.k8s.io
  kind: ClusterRole
  name: cluster-admin
subjects:
  - kind: Group
    name: "k8s.cluster-admin@example.com"
    apiGroup: rbac.authorization.k8s.io
EOF
4. Configure client
Add user to a group
Previously we mapped the cluster-admin role to the k8s.cluster-admin@example.com group. A Google Workspace user needs to be a part of this group.
- Open Groups Console on Google Workspace and create a new group called k8s.cluster-admin@example.com. Add a security label to this group.
- Add your user to this group.
Configure kubectl with kubelogin
You will need the the kubelogin plugin to make kubectl work with OIDC.
Use one of the following methods:
  # Homebrew (macOS and Linux)
  brew install int128/kubelogin/kubelogin

  # Krew (macOS, Linux, Windows and ARM)
  kubectl krew install oidc-login

  # Chocolatey (Windows)
  choco install kubelogin
Verify authentication
Run this command, use the following parameters from dex config which we defined earlier:
- ISSUER_URL - https://dex.example.com
- YOUR_CLIENT_ID - kubelogin
- YOUR_CLIENT_SECRET - some-random-secret
kubectl oidc-login setup \
  --oidc-issuer-url=ISSUER_URL \
  --oidc-client-id=YOUR_CLIENT_ID \
  --oidc-client-secret=YOUR_CLIENT_SECRET \
  --oidc-extra-scope groups \
  --oidc-extra-scope email \
  --oidc-extra-scope profile
This will open browser and ask you to approve OIDC login. In case everything is done correctly, you will see claims provided by Dex.
Configure kubectl
Add a new context to kubeconfig
aws eks update-kubeconfig --name <eks-cluster-name> --alias <eks-cluster-name>-oidc
Add a new user to kubeconfig
kubectl config set-credentials <eks-cluster-name>-oidc \
  --exec-api-version=client.authentication.k8s.io/v1beta1 \
  --exec-command=kubectl \
  --exec-arg=oidc-login \
  --exec-arg=get-token \
  --exec-arg=--oidc-issuer-url=https://dex.example.com \
  --exec-arg=--oidc-client-id=kubelogin \
  --exec-arg=--oidc-client-secret=some-random-secret \
  --exec-arg=--oidc-extra-scope=groups \
  --exec-arg=--oidc-extra-scope=email \
  --exec-arg=--oidc-extra-scope=profile
Apply new user with OIDC auth to the new context, and switch to the new context:
kubectl config set-context <eks-cluster-name>-oidc --user=<eks-cluster-name>-oidc
kubectl config use-context <eks-cluster-name>-oidc
Assuming your current kubeconfig context is pointing to AWS EKS Cluster being configured, try to run a couple of kubernetes commands:
kubectl cluster-info
kubectl get ns
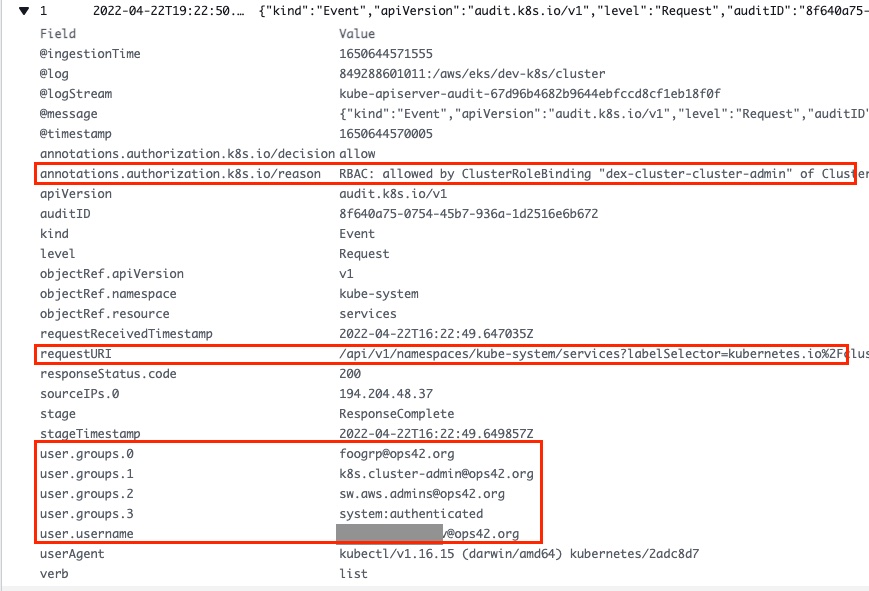
Check EKS Cluster Logs
Now we can properly audit user actions on AWS EKS Cluster. If we open CloudWatch logs, it is now possible to clearly identify WHO did WHAT and WHY it was allowed. Yay! 🚀
Read my other post on IAM User Traceability in AWS EKS.